I first came across the BeagleBone when Roger Monk presented at OSHUG #18 in April 2012.
Get Started for FREE
Sign up with Facebook Sign up with X
I don't have a Facebook or a X account


|
Scooped by
F. Thunus
onto Raspberry Pi |
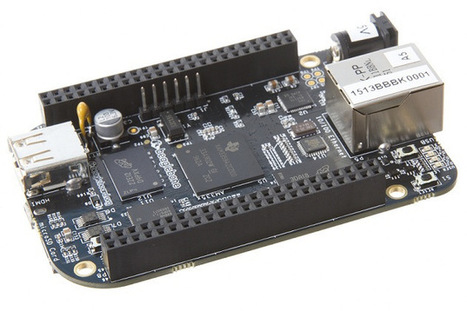
I first came across the BeagleBone when Roger Monk presented at OSHUG #18 in April 2012.

 Your new post is loading...
 Your new post is loading...
Your new post is loading...

The Raspberry Pi project website is http://www.raspberrypi.org/ This is one of my news digests. If you like my editorial choices, there are more to be found by clicking on the "dear reader" link, and on my name above.

Wuzea Recherche's comment,
March 15, 2015 6:45 AM
Propose de rechercher une ressource en tapant un mot clé dans le champ de recherche. Wuzea : http://www.wuzea.com

Vasu10's curator insight,
June 9, 2021 1:49 AM
Takeoff projects help students complete their academic projects. Register at takeoff projects today to find and learn about different interesting big data projects and grab the best jobs. Get started right now.
From
www

Electronic video || Motor wiring diagram || #viral #electrician #electronic #shortvideo
Automatic Plant Watering System using Arduino Tinkercad in English | Block Coding |Irrigation System
From
www
Automatic Plant Watering System using Arduino Tinkercad in English | Block Coding | Irrigation System | Arduino Project | Tinkercad Project | Smart Irrigation System
From
www
Learn how to use L298N Driver with Arduino [Step-by-Step Guide] [2024] - PART 8

From
makezine
The realm of desktop CNC machining is undergoing a creative explosion.What once felt like a niche hobby for techie types is now a super-powered tool for...
From
www
Ever wanted to control LEDs with a joystick? This short shows a cool trick from our full tutorial! ➡️ https://youtu.be/DsQ5K_uGpFg?si=fVjOe_0Mi6B-0HU3
From
www
Welcome to my channel! In this tutorial, I'll show you how to use a Plastic White Wired Door Switch with an Arduino to create a simple door status indicator.
From
www
Hi guys we will show you in this video how to setup your raspberry pi.

STMicro has introduced a combo of 50W wireless charging transmitter and receiver boards, namely the STEVAL-WBC2TX50 transmitter board and the...
From
www
Ever wished your plant could tell you what it needs? Well, now it can! Matt Reed has created a tomato plant that literally talks to you when it needs watering or is too cold. Using a Raspberry Pi and artificial intelligence, this smart plant is equipped with sensors to monitor soil quality, temperature, and moisture levels. 🌡️🌿
From
www
Curious about Arduino Nano but confused by the different types available? In this video, we break down the various Arduino Nano boards, their unique features, and similarities. Find out which one suits your project needs! #ArduinoNano #ArduinoProjects #Electronics #Microcontrollers #DIY #TechExplained #ArduinoCommunity #ArduinoBots #IoT #CircuitDesign
From
www
In this video, we show you how to integrate a Raspberry Pi with the HackRF PortaPack using RPiTX for signal generation. Follow our step-by-step guide to set up your Raspberry Pi, generate signals, and test them on the PortaPack. Enhance your RF skills and discover new ways to utilize these powerful tools for advanced signal testing. Watch now and elevate your expertise in RF technology!
From
www
In this Make Mechatronics tutorial, we delve into the LiquidCrystal and Servo libraries, learning the commands to control LCDs and servo motors effectively. Follow along as we explore the functionalities of these libraries and complete the coding part of the previous video. Witness how we use the potentiometer to control the servo motor and display its angle on the LCD display. Gain practical insights into coding for LCD and servo control, empowering you to implement similar functionalities in your mechatronics projects.
|
Level Up with Arduino UNO R4 WiFi: Features, Pinouts, and Programming [IoT Development Crash Course]
From
www
Welcome to the first lesson of the Arduino Uno R4 WiFi - IoT Development Crash Course!

From
liliputing
Modos Paper Monitor is an open hardware 13.3 inch E Ink monitor (crowdfunding)...
From
www
How to Use I2C LCD with Arduino || LCD Displays with Arduino || i2c LCD Display #i2c #i2clcd #arduino
From
www
install home assistant to raspberry pi (KinCony Server16) beginner guide
From
www
Welcome to my latest DIY project video! In this tutorial, I'll show you how to create a smart home security system using an Arduino and a sensor that triggers a dog barking sound. This simple yet effective project can help deter intruders and add an extra layer of protection to your home.
From
www
Pick your Sunfounder kit up so you get the same results I do:
From
www
this video, we guide you through creating a DIY smoke detector using an Arduino, an MQ-2 gas sensor, and an LCD display. Perfect for hobbyists and beginners, this project helps you understand how to monitor gas levels in real-time and enhance safety in your home or workspace. Follow our step-by-step instructions to build and program your smoke detector. Don’t forget to like, comment, and subscribe for more DIY electronics tutorials!
From
www
Learn how to build and code your very own robot car with the Freenove Three-Wheeled Smart Car Kit for Raspberry Pi! In this step-by-step tutorial, we unbox the kit, guide you through the assembly process, and show you how to configure it for testing. We cover everything from wiring and hardware setup to basic coding commands to get your car moving. Whether you're a beginner or experienced with Raspberry Pi, this project is a fun and engaging way to learn about robotics and programming.

From
linuxgizmos
The SBC-3.5-RK3568 by SECO emerges as a robust 3.5” single board computer powered by the Rockchip RK3568 SoC, combining high performance with extensive connectivity options. This SBC is tailored for a variety of applications, from industrial automation to digital signage and media streaming.
From
www
Join here for code, proteus file and circuit diagram
From
www
Pressure sensors in the context of Arduino are electronic components that can measure the pressure of gases or liquids and provide this data in a format that an Arduino microcontroller can read. These sensors convert physical pressure into an electrical signal that the Arduino can process, enabling a wide range of applications, from weather stations to industrial monitoring systems.
From
www
Welcome to the 𝐀𝐬𝐥𝐚𝐦 𝐇𝐨𝐬𝐬𝐚𝐢𝐧 YouTube channel!
From
www
In this concluding Make Mechatronics tutorial, we complete the coding phase of our Home Automation project. Learn how to convert ADC values from the TMP36 temperature sensor into degrees Celsius and use the temperature sensor to automate fan control. Discover how to utilize the light sensor to automate lamp control and trigger alarms for low soil moisture levels. Follow our step-by-step demonstration as we integrate these functionalities and display temperature data on both the Serial Monitor and a 16x2 LCD. Witness the final testing phase, ensuring seamless automated control of your home environment.
|


add your insight...