Discover the next-generation of Linux distro: easier to use, faster than ever, cutting-edge feature and beautifully designed. A new generation of Linux user is demanding and building distros that are better than ever, so jump on board and discover what you’re missing out on.
This is one of my news digests. If you like my editorial choices, there are more to be found by clicking on the "dear reader" link, and on my name above. Enjoy !
Takeoff projects help students complete their academic projects. Register at takeoff projects today to find and learn about different interesting big data projects and grab the best jobs. Get started right now.
This is part 2 of the Flutter Embedded UART tutorial series. In this tutorial, we will cover how to install and set up Putty on a Linux computer (Ubuntu desktop). Then we will do a loop-back test before testing serial data communications between the systems. All of this work is to prepare for the development of our Flutter Embedded app that will use serial communications to transfer data bi-directionally between the Pi and a computer. Time Line 00:00 to 01:49 Introduction 01:50 to 04:13 Install Putty, set up for the test, fix font bug, and double-check settings. 04:14 to 05:53 Set up and perform a loopback test of the UART serial data using Putty. 05:54 to 06:28 Set up and connect the TTL to USB converter cable. 06:29 to 07:35 Set up and send data from the Pi to the Linux computer (Ubuntu desktop). 07:36 to 08:19 Set up and send data from the Linux computer to the Pi. 08:20 to 08:38 Conclude and requests for like and subscribe.
Link to purchase goods on aliexpress: https://24tch.com/?shop=6931 Buy and Review 2.2 Inch TFT LCD Display Module Touch Screen Shield + ATmega328P Board Kit with USB cable TF Card / Pen Compatible for Arduino on Aliexpress Shop Aliexpress link: https://24tch.com/?shop=6931 - 2.2 Inch TFT LCD Display Module Touch Screen Shield + ATmega328P Board Kit with USB cable TF Card / Pen Compatible for Arduino
Explore the incredible 2.2 Inch TFT LCD Display Module Touch Screen Shield + ATmega328P Board Kit with this must-watch video! This game-changing kit is perfect for anyone looking to take their Arduino projects to the next level. With a 2.2-inch touch screen, I2C temperature sensor, and compatibility with a variety of additional modules, the possibilities are truly endless. Whether you're a seasoned Arduino pro or just getting started, this kit is a must-have for anyone interested in creating digital photo frames, oscilloscopes, function generators, and more. Don't miss out on this incredible technology - check out the link in the description to purchase your kit today. Thanks for tuning in, and happy tinkering!
What is an RFID Smart Lock ? The RFID smart lock with a solenoid lock is a security device that uses radio-frequency identification (RFID) technology to grant access. It operates by reading an RFID tag or card and activating a solenoid mechanism to unlock. This system is keyless, providing convenience and enhanced security. The solenoid lock offers robust locking strength, ideal for various applications such as residential doors, office spaces, and storage units. Users can easily program and manage access permissions, making it a versatile and user-friendly solution.
Although I've not shown how it is I will provide you the comments list: 1)Arduino Uno 2)Relay 3) 12-volt Adapter 4)12c and Lcd Module 5)RFID Card Sensor 6)RFID Card & Tag 7)Jumper Wires 8) A wooden or Acrylic box. 9)Solenoid Lock 10)Hinges 2 11)Door Handle
Pulse Rate/BPM/Heart Beat Monitor with Pulse Sensor & Arduino | Pulse Rate Monitoring on Internet using ESP8266 & ThingSpeak | ECG Monitor with AD8232 ECG Sensor & Arduino | IoT Based ECG Monitoring with AD8232 ECG Sensor & ESP32/ESP8266 | Smart Blood Oxygen & BPM Measurement with MAX30100 Pulse Oximeter & Arduino | IoT Based Pulse Oximeter Monitoring on Blynk & ESP8266 | IoT Based Patient Health Monitoring on Thingspeak with ESP8266 | IoT Based Patient Health Monitor on WebServer with ESP32. *********************************************************** If You Want To Purchase the Full Working Project KIT Mail Us: svsembedded@gmail.com Title Name Along With You-Tube Video Link We are Located at Telangana, Hyderabad, Boduppal. Project Changes also Made according to Student Requirements http://svsembedded.com/ https://www.svskits.in/ http://svsembedded.in/ http://www.svskit.com/ M1: +91 9491535690 M2: +91 7842358459 We Will Send Working Model Project KIT through DTDC / DHL / Blue Dart / First Flight Courier Service We Will Provide Project Soft Data through Google Drive 1. Project Abstract / Synopsis 2. Project Related Datasheets of Each Component 3. Project Sample Report / Documentation 4. Project Kit Circuit / Schematic Diagram 5. Project Kit Working Software Code 6. Project Related Software Compilers 7. Project Related Sample PPT’s 8. Project Kit Photos 9. Project Kit Working Video links Latest Projects with Year Wise YouTube video Links 157 Projects https://svsembedded.com/ieee_2022.php 135 Projects https://svsembedded.com/ieee_2021.php 151 Projects https://svsembedded.com/ieee_2020.php 103 Projects https://svsembedded.com/ieee_2019.php 61 Projects https://svsembedded.com/ieee_2018.php 171 Projects https://svsembedded.com/ieee_2017.php 170 Projects https://svsembedded.com/ieee_2016.php 67 Projects https://svsembedded.com/ieee_2015.php 55 Projects https://svsembedded.com/ieee_2014.php 43 Projects https://svsembedded.com/ieee_2013.php 1100+ Projects https://www.svskit.com/2022/02/900-projects-ideas_8.html *********************************************************** 1. IoT Based Patient Health Monitoring System using ESP8266 & Arduino,
2. DHT11 & NodeMCU Tutorial || Humidity & Temperature Monitoring over Thingspeak,
3. IoT Based Patient Health Monitoring System using ESP32 Web Server,
4. Heart Beat Monitoring over Internet using ESP8266 & ThingSpeak,
5. IoT based Heartbeat Monitoring using Arduino and ThingSpeak,
6. Temperature and Heartbeat Monitoring System Using Arduino with IoT,
7. HEALTH MONITORING SYSTEM,
8. Temperature and Pulse Rate Monitoring using ESP8266 wife module (IOT),
9. ThingSpeak IOT Cloud with NodeMCU ESP8266- Temperature Monitoring Dashboard,
10. IOT Project Nodemcu ESP8266 monitor suhu temperature sensor lm35 thingspeak,
11. Project Heart Rate Monitoring Thingspeak,
12. IOT Based Garbage Level Monitoring Over Internet using NodeMCU - ESP8266 & ThingSpeak Cloud
13. Arduino with Cloud in Tamil | Send temperature sensor value to ThingSpeak using WIFI ESP8266,
14. Monitor Kadar Oksigen dalam Darah (SPO2) Online Thingspeak,
15. IOT ThingSpeak Based Patient Health Monitoring System using ARM7,
16. iot heart rate and body temperature monitoring system,
17. Smart Patient Health Monitoring System using IoT,
18. Heart Beat Monitoring using Arduino, ESP8266 and Pulse Sensor to ThingSpeak.com,
19. Patient heart beat and body temperature monitoring system,
20. ECG SPO2 HEART RATE and Temperature monitoring on Thingspeak using Arduino UNO
21. Iot based Real time heart rate and temperature monitoring with gps localization,
22. Iot patient health monitoring with ECG plot with BP and Temperature on Thingspeak
23. Heart Beat Monitoring over Internet using Arduino and ThingSpeak,
24. BodyStats Heart Rate Monitor ThingSpeak IoT,
25. IoT Based Heartbeat and Temperature Monitoring System for Remote Patients using Raspberry Pi Pico,
26. Micro Health App with Heart Rate and Temperature Sensor,
27. Water quality monitoring using Arduino and Thingspeak pH, Turbidity, Conductivity, temperature,
28. Forest fire detection and monitoring through IoT thingspeak,
29. IoT thingspeak Distribution Transformer monitoring and alerting,
30. Transformer Health Monitoring on Thingspeak with Controlling,
31. Water quality monitoring Turbidity Temperature on Thingspeak,
32. IoT based agriculture data on Thingspeak using Arduino and ESP8266,
33. IoT Temperature Monitoring on Thingspeak and SMS alerts with Auto-dialing,
34. Human Activity Recognition System using Raspberry pi with Blynk App and Thingsboard cloud storage,
35. IOT Liquid Level Monitoring System on Thingspeak,
36. IoT Weather quality monitoring using Arduino and Thingspeak,
37. ECG SPO2 HEART RATE and Temperature monitoring on Thingspeak using Arduino UNO,
38. Solar Power Monitoring Voltage, Lux , Current, Watts, Temperature and MPPT Thingspeak,
This Ngrok tutorial is your one-stop shop for getting started with this powerful tool!
Ngrok lets you expose your local development server to the internet with just a few clicks. Whether you're a seasoned developer or just getting your feet wet, Ngrok can save you tons of time and frustration. ⏰
In this video, we'll walk you through everything you need to know:
Installation and Setup: Get Ngrok up and running on your machine in minutes. Secure Tunneling: Learn how to create secure tunnels to protect your data. Remote Access: Share your local projects with collaborators from anywhere in the world. Ngrok with Developer Tools: Discover how to integrate Ngrok with popular tools like Visual Studio Code for a seamless workflow. ✨
By the end of this tutorial, you'll be a Ngrok pro!
Keywords: ngrok server hosting ngrok hosting ngrok rdp ngrok_auth_token ngrok ngrok download ngrok github twilio ngrok download ngrok ngrok twilio shopify ngrok ngrok server fastapi ngrok ngrok linux ngrok termux ngrok https ngrok minecraft server ngrok http 80 0 tcp ap ngrok io 0 tcp ngrok io 2 tcp ngrok io alan ngrok com aws ngrok better than ngrok brew ngrok cloudflare ngrok cloudflared linux arm64 http 4444 ngrok http 4444 colab ngrok configure ngrok deceptive site ahead ngrok docker ngrok download ngrok for kali linux download ngrok for linux download ngrok for termux download ngrok github download ngrok in termux download ngrok kali linux download ngrok linux efe5a2f2 ngrok io err_ngrok_108 err_ngrok_123 err_ngrok_3004 err_ngrok_3200 err_ngrok_3208 err_ngrok_6022 err_ngrok_6024 err_ngrok_8012 err_ngrok_802 err_ngrok_9018 esp32 ngrok flask ngrok foundry ngrok free ngrok git clone ngrok git hub ngrok github com ngrok github free rdp ngrok github ngrok termux hosting ngrok http efe5a2f2 ngrok io http ngrok com https 0 9a z * ngrok io https ngrok https ngrok com https ngrok com download inflating ngrok installing ngrok io ngrok kali linux ngrok like ngrok linux ngrok localhost ngrok localhost tunnel free mac ngrok mikrotik ngrok minecraft ngrok server minecraft server ngrok minecraft server with ngrok ngrok 2 ngrok 2022 ngrok 8080 ngrok angular ngrok app ngrok arduino ngrok arm ngrok as a service ngrok as service ngrok aws ngrok azure ngrok by inconshreveable ngrok clone ngrok cloud edge ngrok cloudflare ngrok cloudflare tunnel ngrok co ngrok colab ngrok com ngrok com download ngrok cost ngrok custom subdomain
RFID Access Control with Arduino: Full Tutorial#diy #arduino #techinnovation #science
Welcome to my Arduino RFID access control system tutorial! In this video, I will guide you through the process of building a simple yet effective RFID-based security system using an Arduino, RFID reader, and an LCD display. This project allows you to display custom messages for authorized users and control LEDs based on access permissions
✓Arduino Uno ✓MFRC522 RFID reader ✓RFID tags ✓I2C LCD display (16x2) ✓LEDs (Green and Red) ✓ResistorsBreadboard ✓jumper wires
Project Overview:When an RFID tag is scanned, the system checks if the tag is authorized. If the tag is authorized, the LCD displays "TechTwistRaj" based on the tag, and the green LED lights up. If the tag is not authorized, the LCD displays "Access Denied" and the red LED lights up. The system includes a delay to prevent rapid scanning and ensures clear feedback for each scan
arduino tutorial | arduino | arduino rfid tutorial | access control | tutorial | rfid access control | how to make door lock with arduino | arduino project | arduino rfid door lock | arduino rfid project | arduino rfid reader | rfid with arduino nano tutorial | arduino rfid | arduino rfid rc522 | rfid door lock access control system | rfid interfacing with arduino | rfid based door access control using arduino | arduino uno | rfid based access control system using arduino
GIGAIPC PICO-N97A Pico-ITX SBC features an Intel Processor N97 quad-core Alder Lake-N processor coupled with up to 16GB DDR5 SO-DIMM memory and M.2 SATA or NVMe storage designed for passively cooled and enclosed systems for Industry 4.0 applications in smart cities, retail, and healthcare sectors.
Welcome to our tutorial on controlling LED brightness with a potentiometer using PictoBlox and Arduino! In this video, we'll guide you step-by-step through the process of building a simple yet effective circuit that allows you to adjust the brightness of an LED by turning a potentiometer.
We'll start by introducing the components you'll need, including an Arduino board, an LED, a potentiometer, and connecting wires. Next, we'll show you how to set up the hardware, connecting the potentiometer and LED to the Arduino.
Then, we'll dive into PictoBlox, a graphical programming interface that's perfect for beginners. You'll learn how to write a program in PictoBlox to read the analog input from the potentiometer and use it to control the PWM output to the LED, adjusting its brightness smoothly.
By the end of this video, you'll have a clear understanding of how to interface sensors with actuators using Arduino and PictoBlox, and you'll be able to create your own interactive LED brightness control projects. Let's get started!
Don't forget to LIKE, SHARE, and SUSCRIBE for more tech and coding tutorials to advance your skills!
Welcome to our channel! In this video, we bring you an in-depth review of the Pimoroni Inventor HAT Mini. This compact and versatile add-on board for Raspberry Pi offers a range of features for electronics enthusiasts and beginners. We explore its easy-to-use interface, GPIO expansion capabilities, and built-in components such as buttons, LEDs, and sensors. Our review covers its compatibility with various programming languages, its integration with popular development platforms, and the convenience of its compact size. Join us as we delve into the features and benefits of the Pimoroni Inventor HAT Mini – watch now to see why it's a top choice for makers looking to explore and create with their Raspberry Pi projects!
As an Amazon Associate, I earn from qualifying purchases.
The UK Pro Reviewer is a participant in the Amazon Services LLC Associates Program, an affiliate advertising program designed to provide a means for sites to earn advertising fees by advertising and linking to Amazon.co.uk & Amazon.com
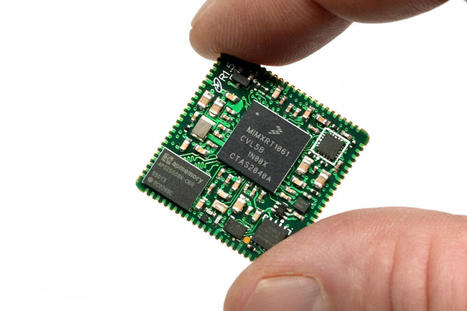
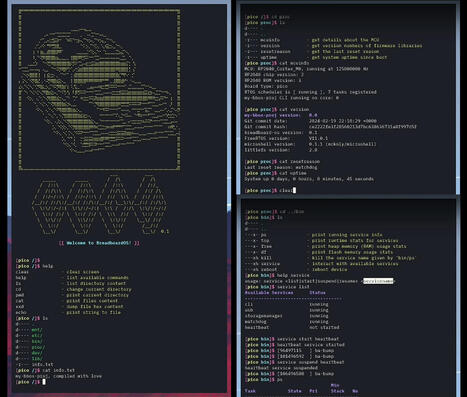
Cavin McKinley's BreadboardOS is an open-source firmware platform for the Raspberry Pi RP2040 MCU (for now) built around FreeRTOS and with a feature-packed CLI that reminds me of the Linux terminal. The terminal implementation is based on a fork of the microshell project with some additional...
To get content containing either thought or leadership enter:
To get content containing both thought and leadership enter:
To get content containing the expression thought leadership enter:
You can enter several keywords and you can refine them whenever you want. Our suggestion engine uses more signals but entering a few keywords here will rapidly give you great content to curate.


 Your new post is loading...